updated: 29 April 2001
Moto Guzzi Sport/Centauro/Daytona RS Fuel Injection Setup Instructions
(Also including some other stuff!)
1) Evaporative Emissions System: Remove the whole
system and run the fuel tank vent hoses to the ground (like a world spec
bike). Connect the intake manifold ports together with a hose.
There are several reasons to remove the system.
2) TPS: You should probably verify the throttle position
sensor output before you change anything else on the FI. Check
it carefully as described below before adjustment, and note where it is
currently set for future reference in case you want to get back where you
started!
The TPS is on the right hand throttle body and is retained by two torx-head
screws (on 1100 Sports, flathead on others), which I replaced on mine with
flathead screws removed from an old Dellorto carburetor. The TPS
output is measured at terminals number 16 and 30 on the computer (under
the seat). You will need to remove the computer from the bike and take
off the connector cover to get access to the terminals. Then reinstall
the computer without the connector cover and you can measure the voltage
with the computer operating/ignition on. For God's sake don't forget
to reconnect the ground wires when you reinstall the unit! Also never
touch the computer connections in any way until the ignition has been shut
off for 30 or more seconds -- There is time delay relay on the computer
power supply!
The TPS output is supposed to be 150 mV +/- 5 mV (digital voltmeter)
when the ignition is on and right throttle is completely closed.
To check this you must disconnect the right hand ball joint on the crossover
rod by prying it apart with a screwdriver. It won't be damaged if
you're careful. Let the RH throttle plate snap closed a few times
to make sure it is fully seated before any adjustment, and do it again
after you reset the TPS to make sure! Oh yes, also make sure that
the idle screw on the right hand throttle is completely backed out, or
removed. The LH idle screw should be used for idle control; the RH
screw is redundant.
This is where things get a bit tricky: I have found that the TPS
output sags 20mV or more in an inconsistent manner when the engine is stopped.
It stabilizes at a higher value when the alternator is spinning on my bike.
So I set the TPS output to 150 mV with the bike running. But the
RH throttle must be completely closed to do this, so basically the bike
is running like crap at 1200 rpm on only the left cylinder when I reset
the TPS! The throttle linkage is disconnected.
Take note that the sensor is EXTREMELY sensitive when you adjust it.
When you tighten the screws it can sometimes push the output voltage out
of spec. so its an iterative process to get the TPS set correctly with
the engine running and RH throttle body completely closed. A bit
tricky!
After you get done with TPS adjustment reconnect the throttle linkage
crossover rod, and reinstall the cover on the connector.
3) Idle Mixture Screw: This is located in the computer under
the rubber plug, which is covered by the Moto Guzzi labeled decal.
It's a tiny screw on a trim potentiometer; use an eyeglass screwdriver.
The full range of adjustment is 270 degrees and clockwise is leaner, CCW
is richer. Adjust the screw full rich (full CCW) for now.
4) Throttle Plate Synchronization: First completely close the
bypass screws located on the bottom of the throttle bodies. Then
synch the throttles at 2500 rpm with the thumb-wheel on the crossover linkage.
Check to make sure its more or less synched over a range of RPMs, but it
won't be perfect everywhere. Use a good set of carb sticks and get
it as close as possible.
5) Bypass Screws: Open both bypass screws (after throttle synching)
to about 1/2 turn open before removing the carb sticks. Adjust one
side to get the idle sych spot on. One side will probably need to
be a little more open than the other to maintain synch at idle. Recheck
the higher rpm synch after you open the bypass screws.
6) Idle Speed: Set the idle speed at 1200 rpm with the left hand
TB idle stop screw, recheck synch everywhere and disconnect the carb sticks.
Now go out and test ride it!
If the bike runs OK you can experiment a bit with leaning out the idle
mixture screw. If it starts to miss at a leaner screw setting richen
it up to the point that it doesn't.
Addendum: Moto Guzzi 1100 Sport Fuel Injection Setup Instructions
By Carl Allison
guzzi007@pacbell.net
I would like to point out that Will Creedon offers an exceptionally
well researched map chip for the ECU that cures almost all of the FI ills
of the Sport 1100i. Will also has chips for Daytonas and Centauros.Contact Will at:
will creedon <creedon@cts.com>
Will's excellent instructions are enough for anyone with a digital voltmeter
to set up their own TPS. I would like to add the following illustrations
(liberally scanned from original Moto Guzzi manuals and cleaned up in PhotoShop)
and some observations of my own.
READ AND HEED!!!
In the procedure, pin outs are for the Sport 1100i, Daytona RS and
Centauro, the diagrams are for the Sport 1100i only.
ALLof the other EFI Guzzi's, EV's, Bassa's, whatever will
have different computer connections, TPS housings and maybe different wiring
color coding. DO NOT ASSUME that the procedure is a universal panacea
for every goose rolling around on two wheels with an ECU in it. You could
do real damage pulling connectors apart on the computer etc. FWIW, my personal
take is stick to the sensor itself and use the 150mv specification in accordance
with the physical part of the adjustment. If you're uncomfortable with
pulling linkages, then don't, you will still get good results - providing
that the original idle stop has never been changed, if it has, you will
have to disengage the right side from the left per Will's instructions.
I do urge using a good set of balance sticks or a TwinMax in addition to
setting the TPS.
If you're on this web site, than you know that I have a wiring harness
layout schematic and a legend for the wiring as well. You're welcome to refer to this diagram. It is essentially correct and it get's corrected as I receive feedback from users. Unlike the diagram that came with the Sport 1100i, at least I have gone through the effort to supply the EFI connections as well.
Rather than going through the labor of removing the seat and playing
around with the computer connector, you can access the wires right at the
TPS. The wire colors at the sensor (not the computer) that you check across
are Pin A (white) and pin C (red/black) - the outside terminals on the
connector. The center terminal (yellow) you don't use for setting the TPS
as that is the + voltage supply from the ECU.
It's very easy to do. Here's how:
1) Remove the torx screws if you don't have a torx wrench that fits.
I filed a slot and used a screwdriver to remove them. In place of the torx
screws install some metric allen head screws. That would be M4 .7 15mm
metric coarse screws. It really helps to place a very small round washer
under the head of the allen screw and the original sqare plate to decouple
the screw rotation from the TPS housing when loosening or tightening the
screw. Make sure you have the correct allen wrench for your newly upgraded
TPS mount.
2) Get two fairly stiff pieces of bare wire (I use safety wire) about
1 1/2" long.
3) Pull back the rubber weather cover from the TPS wiring harness connection.
4 Slip one wire alongside the TPS wiring in the connector all of the
way in until it bottoms, one on each side, A and C.
5) Hook up the digital voltmeter and start your procedure.
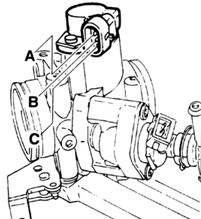
The TPS viewed from the middle of the engine looking out.
showing the connector pins without the wiring connector.
(Errata: the original manual illustration shows the meter
probes as going to pins A and B. This is wrong, it should
show the meter probes on A and C.)
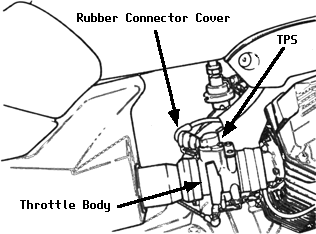
The TPS viewed from the right side of the bike.
